First content type
Build the example plugin's category content type with the VitNode Content Engine. One TypeScript definition gives you a migrated table, an AdminCP screen, staff API routes and staff permissions.
This tutorial builds example.category, the content type behind AdminCP → Example → Categories in VitNode's example plugin. You write one definition, wire it into four small files, run one migration, and get a Postgres table, a list with a create form, staff-only API routes and four staff permissions. Categories have one field, so you spend your time on the wiring instead of naming things.
Every snippet is copied from plugins/example, with unrelated content types trimmed out. Use your own plugin id wherever you see @vitnode/example.
Before you begin
You need a plugin that your app already loads, with src/config.api.ts, src/config.tsx and a src/const.ts that exports the plugin id:
export const CONFIG_PLUGIN = { pluginId: "@vitnode/example" as const };Create a plugin generates all three. You also need a running PostgreSQL database and an AdminCP account.
Declare the content type
Create src/content/category.ts:
import { defineContentType, field } from "@vitnode/core/content";

export const categoryContentType = defineContentType({
  id: "example.category",
  tableName: "example_categories",
  fields: {
    name: field.text({ required: true, minLength: 1, maxLength: 100 }),
  },
  admin: {
    path: "example/categories",
    list: {
      columns: ["name", "createdAt"],
      orderableFields: ["name"],
    },
  },
});idisplugin.entity, lowercase and dot separated. The part after the first dot (category) names the translations and the permissions.tableNameis the Postgres table, in snake_case.admin.pathsets the AdminCP URL,/admin/content/example/categories.list.columnsmay name your fields and the system columnsid,createdAtandupdatedAt.orderableFieldsmakes the Name header sortable.
You get a few things without asking: the list searches its text columns, the first text field becomes the record's title, and create and edit open in a dialog. Every field helper is listed in Fields.
Create the model
Create src/database/categories.ts. createContentModel turns the definition into a Drizzle table, Zod schemas and a service:
import { createContentModel } from "@vitnode/core/content/server";

import { categoryContentType } from "@/content/category";

export const categoryContent = createContentModel(categoryContentType);

export const example_categories = categoryContent.table;
Export the table. Drizzle Kit finds tables by reading the exports of your plugin's built dist/src/database/*.js files, so a table nobody exports never reaches a migration.
Add the staff API routes
Create an admin module and pass the model to buildContentAdminModule:
import { buildModule } from "@vitnode/core/api/lib/module";
import { buildContentAdminModule } from "@vitnode/core/content/server";

import { CONFIG_PLUGIN } from "@/const";
import { categoryContent } from "@/database/categories";

export const adminModule = buildModule({
  pluginId: CONFIG_PLUGIN.pluginId,
  name: "admin",
  routes: [],
  modules: [
    buildContentAdminModule({
      pluginId: CONFIG_PLUGIN.pluginId,
      contentTypes: [categoryContent],
    }),
  ],
});
Then add the module to your API plugin. This is an excerpt of src/config.api.ts:
import { adminModule } from "@/api/modules/admin/admin.module";

export const exampleApiPlugin = () =>
  buildApiPlugin({
    pluginId: CONFIG_PLUGIN.pluginId,
    modules: [adminModule],
  });
The routes live under /api/@vitnode/example/admin/content/category and only answer staff signed in to the AdminCP. Keep the module named admin, because the API checks the AdminCP session on paths that contain /admin/.
Add the AdminCP screen
The AdminCP needs two things from your plugin: a sidebar link and the screen behind it. They live in separate files on purpose. The sidebar loads on every AdminCP page, while the screen's forms load only when someone opens it.
Create src/admin/nav.tsx with the sidebar link:
import { FolderIcon } from "lucide-react";

import { CONFIG_PLUGIN } from "@/const";
import { categoryContentType } from "@/content/category";

export const adminNav = {
  pluginId: CONFIG_PLUGIN.pluginId,
  contentTypes: [{ definition: categoryContentType, icon: <FolderIcon /> }],
};
Create src/admin/content.tsx and reuse the same list for the screen:
export { adminNav as adminContent } from "./nav";That one line is enough for the generated list and forms. Later, this is the file where you swap in custom cells, fields or form layouts. VitNode finds both files by name, so keep the paths and the adminNav and adminContent exports.
Name everything
Labels come from your plugin's src/locales/en.json. Content type strings live under content.category, and each staff permission gets a top-level key:
{
  "@vitnode/example": {
    "title": "Example",
    "content": {
      "category": {
        "label": "{count, plural, one {Category} other {Categories}}",
        "title": "Categories",
        "desc": "Group articles together.",
        "fields": {
          "name": "Name",
          "createdAt": "Created"
        }
      }
    }
  },
  "@vitnode/example:category": "Categories",
  "@vitnode/example:category:can_view": "View categories",
  "@vitnode/example:category:can_create": "Create categories",
  "@vitnode/example:category:can_edit": "Edit categories",
  "@vitnode/example:category:can_delete": "Delete categories"
}
label is an ICU plural, used in buttons and messages such as Create Category. title and desc head the list, and the plugin's own title names the sidebar group. A missing key falls back to a readable version of the field name, and a missing permission label shows its raw id.
Build and migrate
Run this from the workspace root:
bun run build:plugins && bun run db:migratedb:migrate reads the built plugin, so always build first. It writes a migration to apps/api/migrations/ and applies it. This is the part of the example plugin's migration that creates categories:
CREATE TABLE "example_categories" (
	"id" serial PRIMARY KEY NOT NULL,
	"createdAt" timestamp DEFAULT now() NOT NULL,
	"updatedAt" timestamp DEFAULT now() NOT NULL,
	"name" varchar(100) NOT NULL
);
ALTER TABLE "example_categories" ENABLE ROW LEVEL SECURITY;
CREATE INDEX "example_categories_created_at_idx" ON "example_categories" USING btree ("createdAt");
CREATE INDEX "example_categories_updated_at_idx" ON "example_categories" USING btree ("updatedAt");
You declared one field. The engine added id, the two timestamps and their indexes. Database lists everything it generates.
Restart the dev server
Stop pnpm dev and start it again. The API registers routes when it starts, so the new staff routes exist only after a restart.
Create a few categories
Open AdminCP → Example → Categories and click Create Category. The dialog is generated from your fields, so it has a single Name input with the 1 to 100 character limit from the definition.
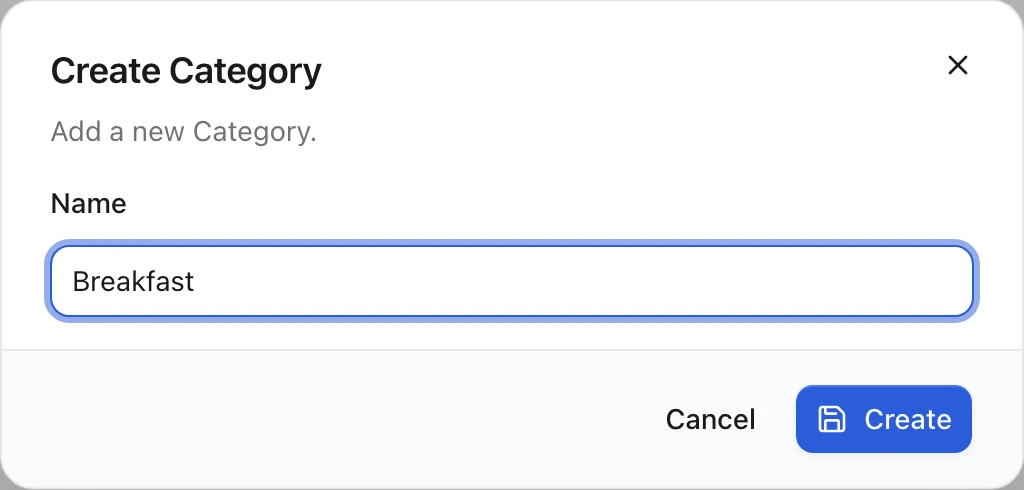
Click Create. A toast says "Category has been created." and the list refreshes. Add a couple more so there is something to sort.
Check the result
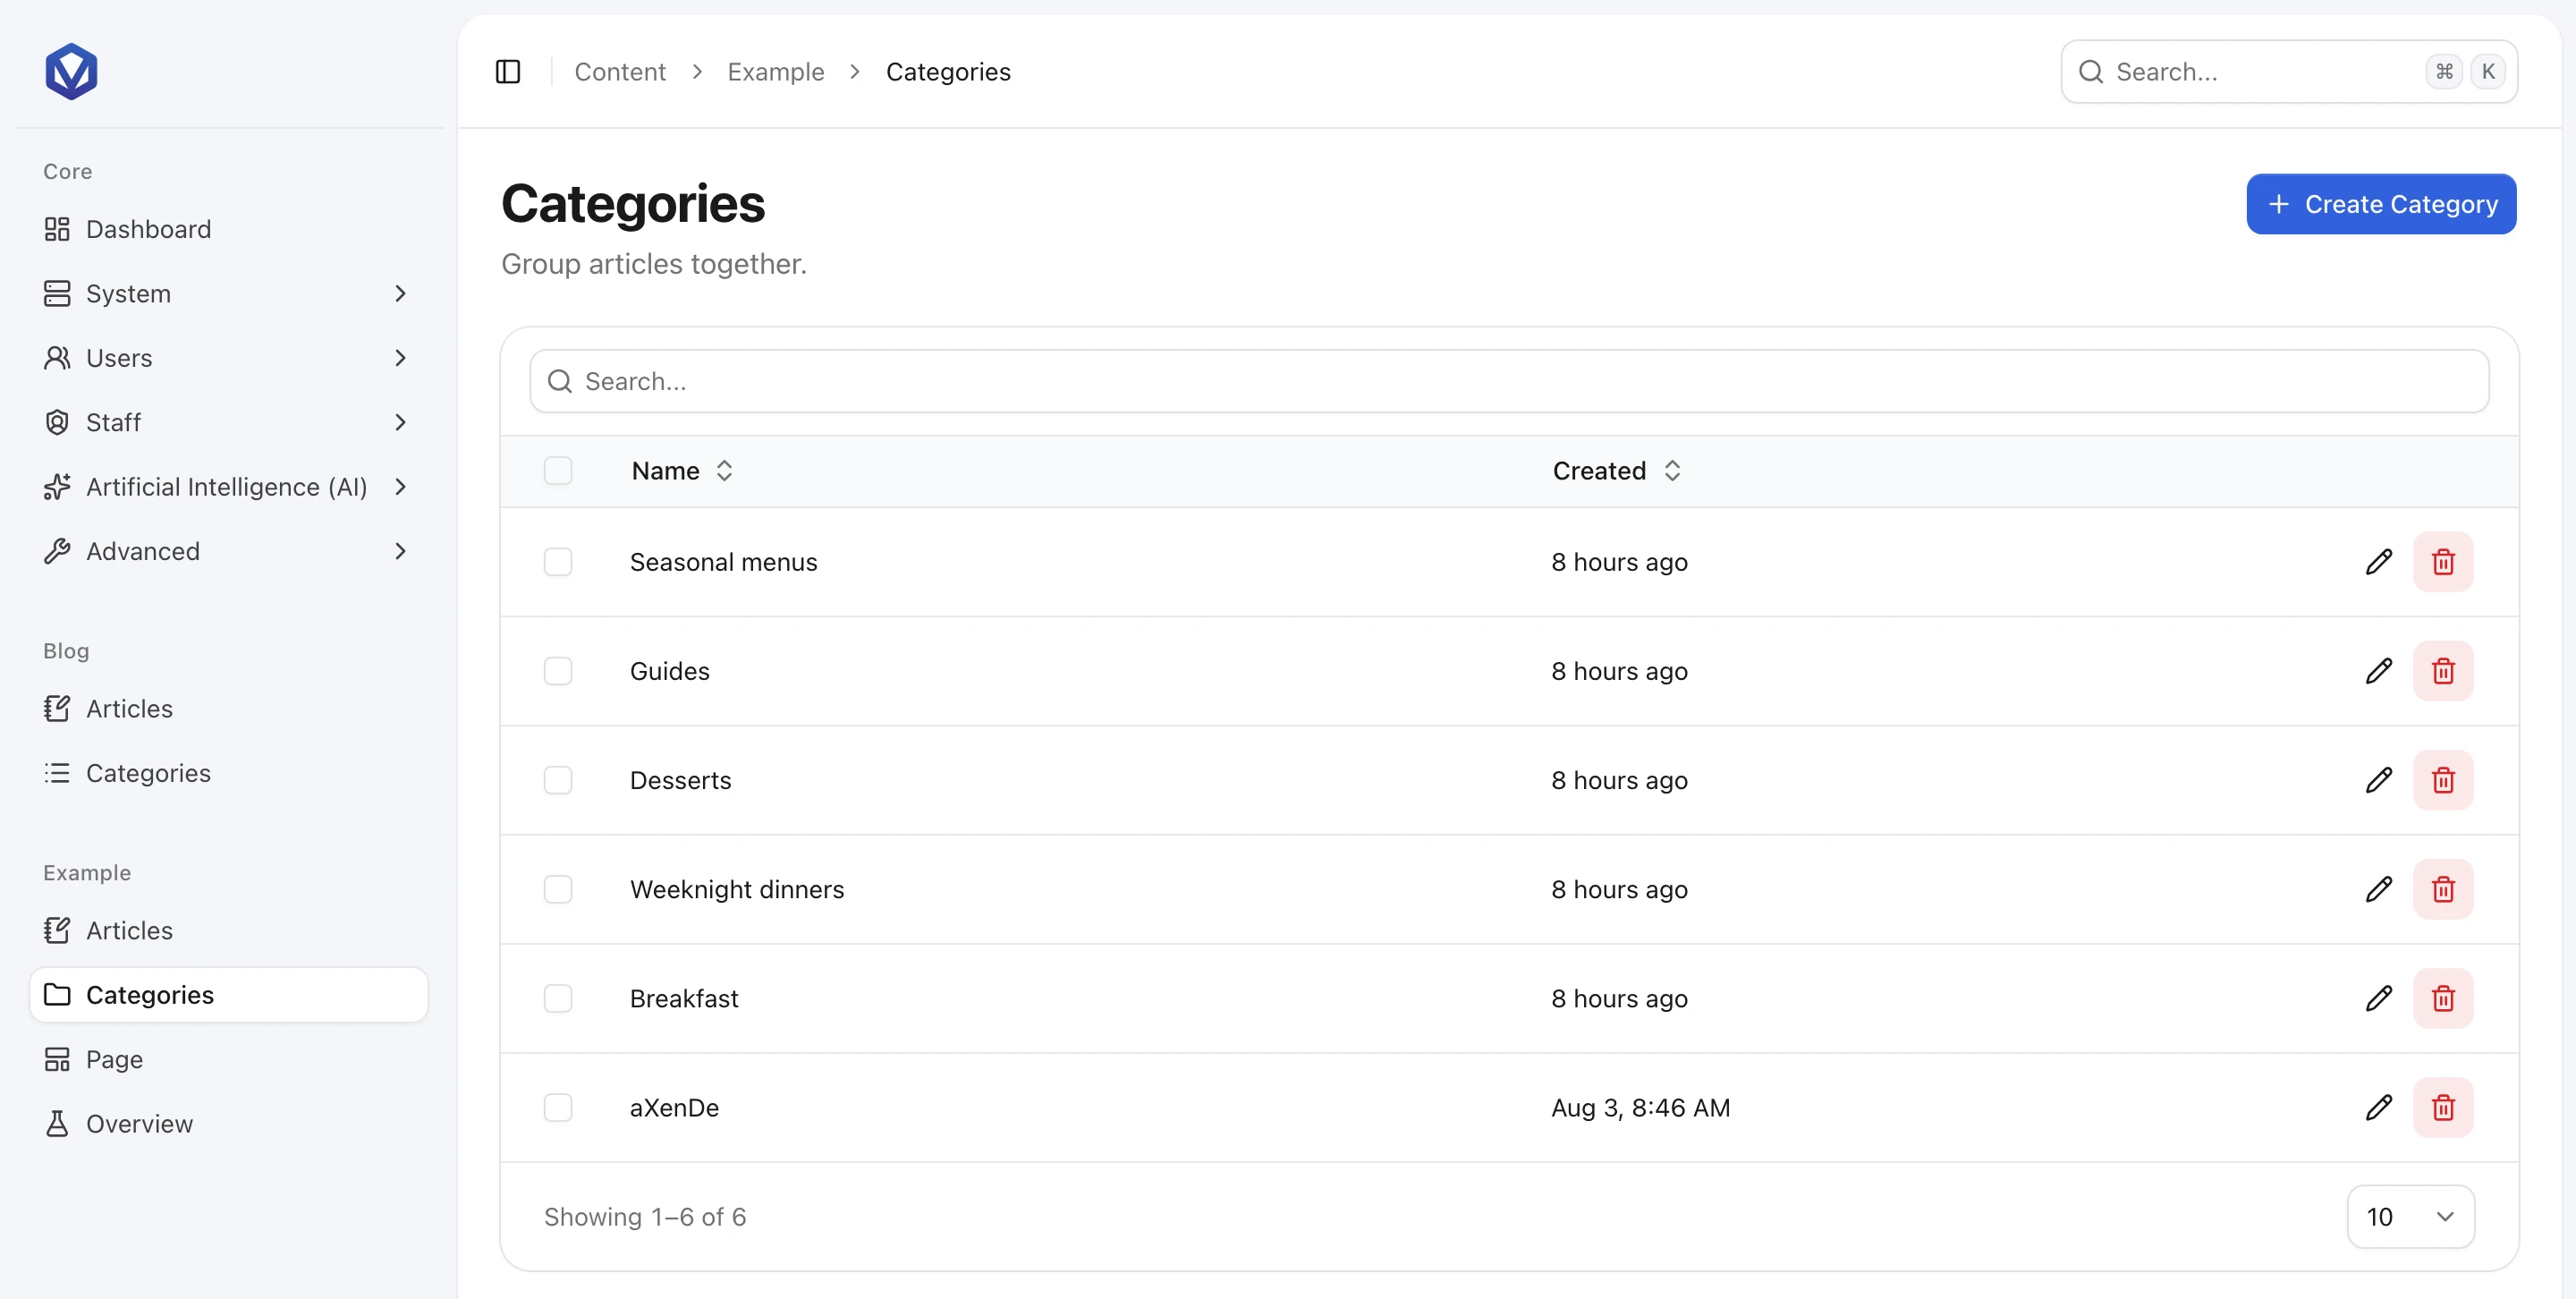
The list shows your categories with the Name and Created columns from list.columns. Click Name to sort, or type in the search box to filter by name.
Now open AdminCP → Staff → Administrators, edit an administrator, choose Restricted and select Example. The Categories group holds the four permissions the Content Engine generated from your definition, labelled by your locale keys. Create, edit and delete each require view. Every generated route checks them, so an administrator without Delete categories gets a 403 from the delete route and no delete button in the list.
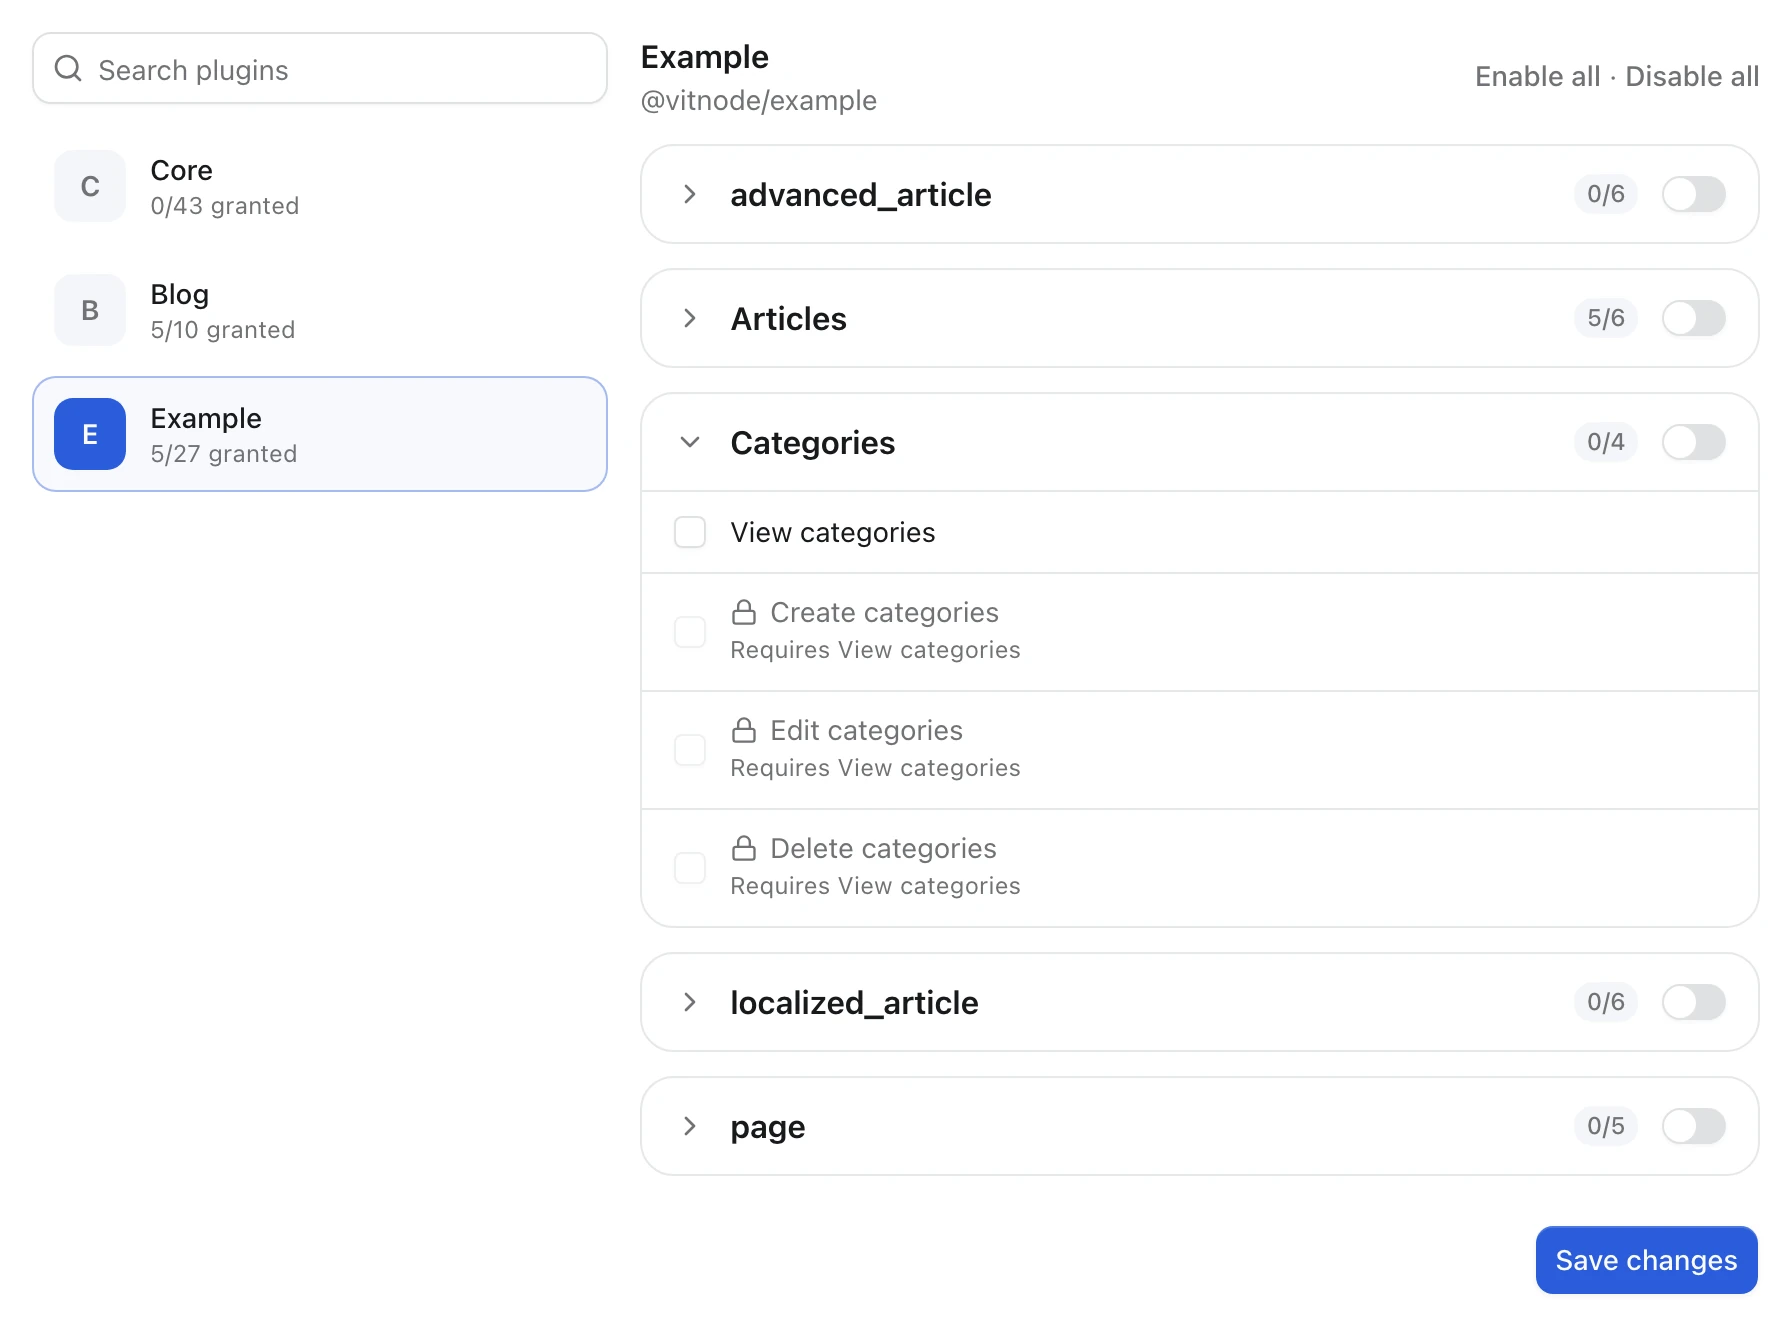
The advanced_article, localized_article and page groups next to it have no labels in the example plugin. That is what a missing permission key looks like.
Next
Categories are staff-only. To publish content to visitors, add drafts and a read-only API in Public API.